DNS Management Tutorial with Hostereo
This tutorial will guide you through managing your DNS settings using Hostereo.
Before You Begin
Make sure you:
Own a Domain Name: You need a registered domain (e.g., example.com).
Have a Hostereo Account: Ensure you have signed up for an account on Hostereo.
- Go to App Management

- Log into the Hostereo Platform: Use your credentials to access the platform.
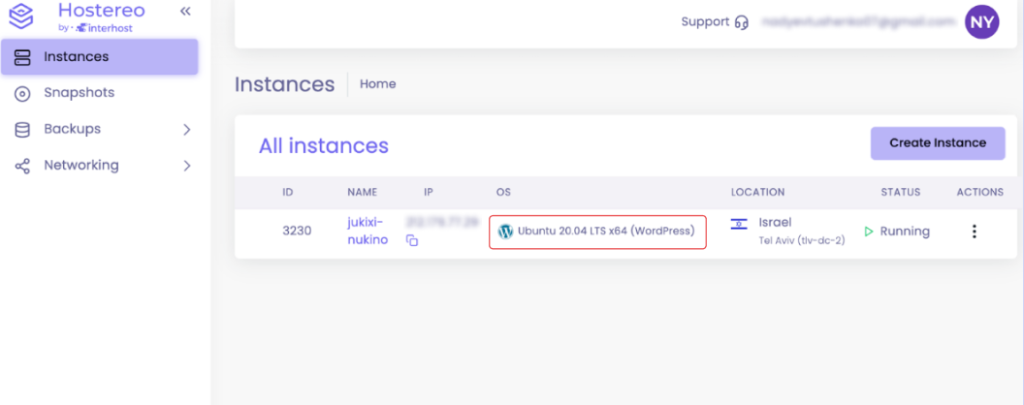
- Navigate to Instances: Once logged in, click on ‘Instances’ in the top menu bar.
- Select Your VM: From the list of available virtual machines, select the one you want to work with.
- Access Server Details: After selecting your VM, click on ‘Server Details’ to view more options.
- Manage Your Application: In the ‘Server Details’ section, find and click on the ‘App Management’ tab.
- DNS Management: In the ‘App Management’ section, look for the ‘DNS Management’ area to start managing your DNS settings.
2. Add Your Domain to Hostereo
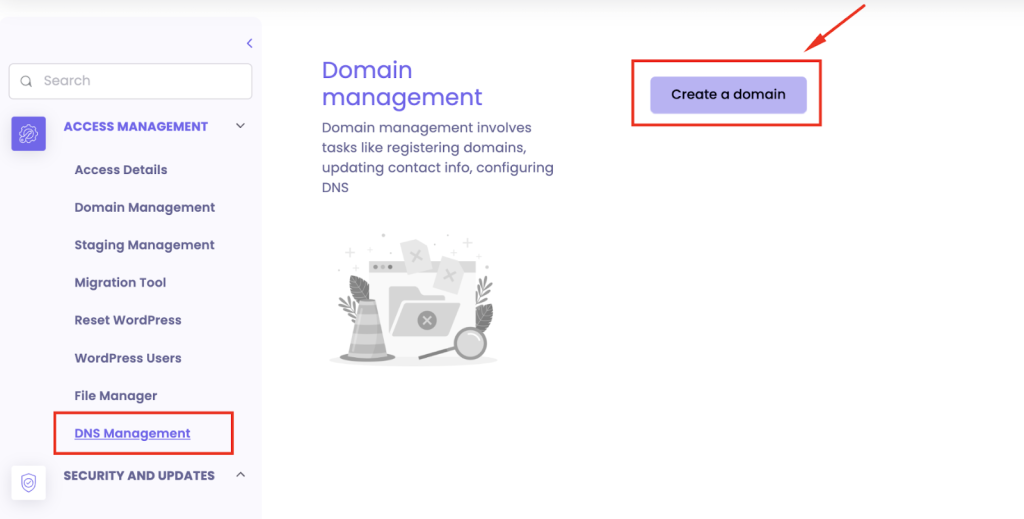
Navigate to DNS Management section to Add Domain:: In the ‘App Management’ section, click the ‘DNS Management’ tab.
Create a New Domain: On the right side of the screen, you’ll see a button labeled “Create a domain”.
Click this button to start the process of adding your domain to Hostereo.

Enter Your Domain Name: A popup will appear with the title “Enter your domain name”.
In the provided field, type the full domain name you want to add (e.g., example.com).
Confirm Your Entry: Once you’ve entered the domain name, click on the “Confirm” button to proceed.
Hostereo will now add your domain to the platform.

Review Your Domain:
After confirming, your domain will appear in the list of domains you manage.
Click on your newly added domain to review its DNS settings and make sure everything is set up correctly.
3. Set Up DNS Records
In this step, you will learn how to add and manage DNS records for your domain using the Hostereo platform. DNS records are essential for directing traffic to your website, handling emails, and other domain-related functions.
What Are DNS Records?
DNS records are like instructions that tell the internet where to find your website or how to route your emails. Here are some of the most common types:
- A Record: Maps your domain or subdomain to an IPv4 address (e.g., 192.0.2.1).
- AAAA Record: Maps your domain or subdomain to an IPv6 address (e.g., 2001:0db8:85a3::8a2e:0370:7334).
- CNAME Record: Points a domain or subdomain to another domain name (used for subdomains).
- MX Record: Directs email to a mail server for your domain.
- TXT Record: Stores text information, often used for verification and security purposes, such as SPF records.
How to Set Up DNS Records in Hostereo
- Go to the DNS Management Section: In the “DNS Management” area, you will see the option to add and manage DNS records.
- Add a New DNS Record: Click the “Add Record” button to create a new DNS entry.
- Select the Record Type: From the “Type” dropdown menu, select the type of DNS record you want to create (A, CNAME, MX, TXT, etc.).
- Fill in the Required Fields:
- Name: Enter the subdomain or root domain (@ for root domain, or www, test, etc., for subdomains).
- IPv4 Address (for A Records) or other relevant content (for other types of records): Enter the destination IP address or target domain.
- Proxy Status: Toggle this option if you want traffic to be routed through Hostereo’s proxy servers (optional).
- TTL (Time to Live): Choose how long the DNS record should be cached by DNS servers. Options include “Auto”, 1 min, 5 min, etc.
- Comment: Add any notes or comments about the record for your reference (optional).
- Save the Record: After filling in all the required fields, click “Save” to add the DNS record.

- Verify and Test: After saving, the DNS record will be active. You can use online tools or CLI commands to verify that the record is resolving correctly.
Example: Adding an A Record
Let’s say you want to point the subdomain test.yourdomain.com to the IP address 185.217.99.225:
- Type: Select A from the dropdown menu.
- Name: Enter test.
- IPv4 Address: Enter 185.217.99.000.
- Proxy Status: Decide whether to enable or disable the proxy.
- TTL: Set to Auto or choose a specific time.
- Comment: (Optional) Enter any relevant notes, like test.
- Save: Click “Save” to finalize the record.
Once saved, test.yourdomain.com will point to the IP address 185.217.99.000.
4. Verify Nameserver Changes
After you’ve added your domain and set up the necessary DNS records in Hostereo, the next step is to ensure that your domain is using the correct nameservers provided by Hostereo.
What Are Nameservers?
Nameservers are a critical part of the DNS system, acting as the directories that tell the internet where to find your domain’s DNS records. For your domain to be fully managed by Hostereo, you need to ensure that your domain is pointed to the nameservers provided by Hostereo.
Steps to Verify and Update Nameservers
- Check Assigned Nameservers:
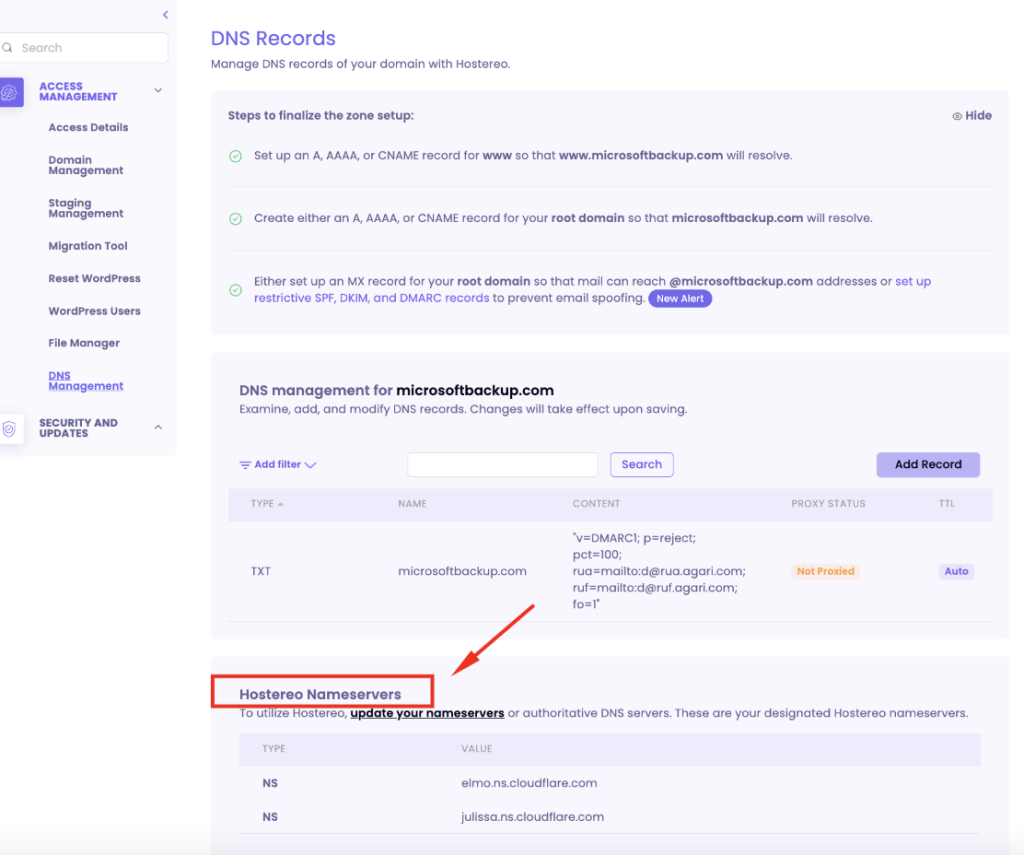
- In the “DNS Management” section of Hostereo, locate the “Hostereo Nameservers” section.

- This section lists the nameservers assigned to your domain by Hostereo (e.g., elmo.ns.cloudflare.com and julissa.ns.cloudflare.com).
- Log In to Your Domain Registrar:
- Go to the platform where you originally registered your domain (e.g., GoDaddy, Namecheap).
- Log in to your account.
- Navigate to DNS or Nameserver Settings:
- Find the section where you can manage DNS or nameserver settings for your domain.
- This is typically found under domain settings, DNS management, or a similar section.
- Update Nameservers:
- Replace the existing nameservers with the ones provided by Hostereo.
- Make sure to remove any old nameservers and enter the Hostereo nameservers exactly as they appear.
- Save Changes:
- Once you’ve updated the nameservers, save the changes.
- It may take up to 24 hours for these changes to propagate across the internet.
- Verify Nameserver Update:
- After making the changes, use tools like What’s My DNS to check if the new nameservers are active.
- You can also use CLI commands to trace the DNS resolution and confirm that the domain is using the correct nameservers.
Linux/Unix:
bash
dig
Windows:
bash
Copy code
nslookup
5. Monitor DNS Propagation and Finalize Setup
After you’ve updated the nameservers and set up your DNS records in Hostereo, it’s crucial to ensure that everything is working as expected. This final step will guide you through the process of verifying the changes and monitoring your domain’s functionality.
1. Wait for DNS Propagation: After making changes to your nameservers, it can take anywhere from a few minutes to 24 hours for the changes to propagate across the internet. This means that the new settings may not take effect immediately.
2. Verify Nameserver Changes
- Use tools like What’s My DNS or command-line tools to verify that the nameservers have been updated correctly.
- Check that the domain is now pointing to the Hostereo nameservers and that all DNS records are resolving as expected.
Linux/Unix:
bash
Copy code
dig
Windows:
bash
Copy code
nslookup
3. Test Domain Functionality
- Visit your website to ensure it is loading correctly.
- If you have set up email records (MX records), send and receive test emails to confirm that email routing is functioning properly.
- Make sure any other services linked to your domain (like FTP or custom apps) are also working without issues.
4. Regularly Monitor DNS Settings
- Even after successful propagation, it’s a good practice to periodically review your DNS settings. This ensures that your domain remains secure and all services are functioning as intended.
5. Enable DNSSEC (Optional)
- If you need enhanced security, consider enabling DNSSEC (Domain Name System Security Extensions). This adds an additional layer of protection against DNS spoofing attacks by ensuring that the DNS information you receive is authentic and unaltered.
By completing these steps, you have successfully managed your domain’s DNS settings using Hostereo. Whether it’s setting up your website, email, or other services, ensuring your DNS records and nameservers are correctly configured is essential for the smooth operation of your domain.
We trust this tutorial has been of assistance. If you need help, please search your query on Hostereo FAQ or create a support ticket.
אחסון VPS – אחסון אתרים VPS
כאשר אתם מתכננים להקים אתר אינטרנט או לשדרג את האחסון הקיים שלכם, אחסון VPS (Virtual Private Server) מהווה אפשרות מצוינת שכדאי לשקול. אחסון אתרים […]
טיוטה אוטומטית
How can I increase my limits?
There are two options to increase your limits: Request a limit increase through customer support: If you need to increase your limits, you can contact […]


